How to redirect Godaddy without www domain to with www

Posted by Golden Dragon In | 3 comments»
Do you have a domain purchased from Godaddy? Normally what you do is just connect your website or blog to the domain and continue. But have you ever checked whether your website works without www? If not just try it now. Most probably if you are not aware of that fact, your site without domain would not work.

Normally search engines identify the domain with www and the domain without www as two different domains. Hence it is needed to make sure you redirect without www domain to the domain with www. As I explained in the post how to add GoDaddy domain to your Blogspot Blog, there's a option in blogger to automatically redirect to www.

Redirect Godaddy without www to with www
Why it is so important?

If your domain without www is not redirected to www, then you will lose a considerable traffic to your site. Lets say your domain is popular. Then they will type your site name on the address bar and hit enter. There's a high possibility that they may not type www.

If that happens, he/she may not come to your site. They will see some advertising links of your domain seller and browse away. So you need to forward your domain now.

Let's see how this is done in Godaddy through Domain Name Forwarding.

Step 1 : First log into your GoDaddy Account.

Step 2 : In the Domains Panel, Click Launch.

Step 3 : Select the domain name you want to forward, Click Forward, then select Forward Domain (As in the below picture)

Godaddy domain forward to www

Step 4 : In the popup select http:// or https:// depending on your server settings. In normal cases it is http://. In the Forward to field, enter the URL you want to forward your domain name to. Here add the full domain including www. (As in the below picture)

Godaddy Domain Forwarding wizard

Step 5 : Select Update my DNS setting to support this change. So that your DNS settings will automatically update for the forwarding. Now click OK.

Now your domain is ready. It will take some time (usually around half an hour) to update the changes. Once the changes are updated, your domain without www will successfully redirect to the domain with www.

Are you a Victim of a FB Pornographic Photo Tag?

Posted by Golden Dragon In | 0 comments»
Recently one of my friends had a big problem with his facebook account. He is basically not an IT guy. Joined Facebook few years ago and has added few friends all over the world without personally knowing them. He usually surfs internet and checks for updates on facebook on regular basis at the workplace.

One day when he logs into his facebook account at the workplace his wall was full of pornographic images. The girl next to him has already seen these and she has initially misunderstood him as he's watching porn on his office computer. Unfortunately he was unaware of how to remove the facebook photo tags.

Avoid unwanted facebook photo tags
Improving your facebook account's security is the only thing you have to do to get rid from these bad experiences.

Even though there are many security features offered by facebook, most of us are unaware of these facilities. Let's see how we can improve your facebook account's security.

If you can follow the following few methods, you won't probably be worried about your facebook account's security.

First you need to go to Privacy Settings. Then select Edit Settings on the section Timeline and Tagging.

facebook timeline and tagging

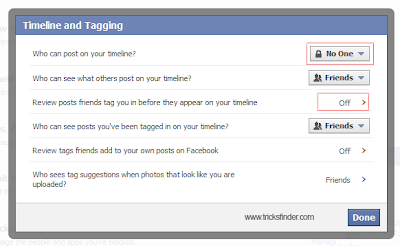
Then you will get a box with the properties as shown in the image below. This is where you need to alter for a better privacy. It's better to change "who can post in your timeline" into no one.

facebook tagging properties
The option to review the friend's post would be set as off on default. So you need to set it On. Then you will get a pop up. You need to make it "Enabled" if it is "Disabled" by default. That's all what you need to stop tagging into posts. If anyone tagged you, you will get an instant notification saying you have been tagged by someone. Then you will have the option to approve the tag or decline the tag.

Further, you can follow few guidelines below in order to protect your facebook account as well. May be you have thousands of friends in Facebook. More friends means you are sociable, but on the other hand that means you are more insecure on your privacy.

Tip 1 : Always look at the address bar before logging into facebook. If you are surfing internet in a cyber cafe, this is a must. Look the address bar twice and make sure that the address is https://www.facebook.com, because there may be phishing sites which looks exactly like facebook.

Tip 2 : Avoid logging into facebook as much as possible from public computers. 

Tip 3 : If you got a friend request by a profile with a half naked female picture, surely it is a fake male account. So be careful when adding them as friends and chatting with them. If your facebook account already has such friends then remove them and report. Otherwise block those accounts.

Tip 4 : Avoid clicking any link which you don’t know. Those links will probably direct you to problematic content. Don't authorize your account for unwanted facebook applications.

Tip 5 : Never give your facebook account password to anyone. Be sure to sign out before you leave the computer.
If you can simply follow the above tips, then you can avoid yourself getting in to more troubles.

Add a custom Permalink to your Blogspot Blog

Posted by Tricks Guru In | 1 comments»
Recently I have experienced that blogger is changing its mechanism and the interface more rapidly. As I feel the main reason behind these changes is to retain the existing blogger users and to compete with wordpress. Most newbie bloggers use blogspot because it is really easy to handle. But when the blogger users gaining the expertise and needing more resources and flexibility, they shift to wordpress.

Hence blogger is adjusting themselves to provide the main features which the existing users are demanding. Now blogger provides many options to the blogger users specially to increase the search engine optimization of the blogger blogs where the early blogger users were complaining of. From those options, one is the introduction of custom permalink to the blogger blog posts.

add a custom permalink to blogspot blog
Permalink is the permanent link address of the web page, shown by the words/text which is in the relevant url. In wordpress you can add any keyword to the permalink, which increases the SEO position of the page. Earlier blogger didn't allow users to change the url as their wish. But now they do.

This can't be done in the normal blogger interface. If you log in to normal blogger interface, you won't be able to see such an option. So you have to go to the below url.

http://draft.blogger.com

Once you logged in and click on a New Post, you will see the option of permalink. Once you click on it you will see automatic and custom options. In custom url option type your desired permalink.

Don't use spaces between words. Instead use the hyphen "-" for the spaces. You are done.

Note : If you are worried about SEO power of the url, try to target a keyword and add the keyword on the permalink. Then your post will be more worthy to the search engines because that's what most of the people would look for.

This method can be used to manipulate the keywords as well. But make sure that you won't add as much as keywords to the permalink. Try this method on your blogspot blog and feel the difference of the outcome of this new option by Blogger.