Tricks Finder Social Sharing Widget at the bottom of the post content

Posted by Golden Dragon In | 0 comments»
This time I thought of introducing a great social sharing widget for you to place it under the post content. This is a blogger xml modification which needs to be added to your template. I have seen many of the bloggers have added the default addthis and sharethis widgets to share the content. But as far as I can see, most of them are not looking great if your blog's colours are not matching or if it's extremely dark.

Earlier I explained how to add a nicely aligned addthis sharing widget to your blog post footer. This was done by modifying the original addthis code. For this new widget I'm introducing I used the same concept, but only added the addthis share button to share with other networks.

Tricks Finder Social Sharing Widget
Sometimes when you add the different sharing buttons from different networks, you will find it difficult to align the buttons horizontally as well as vertically. But I hardly see something nicely aligned buttons used in blogger platform apart from wordpress.

In this widget, I have initially added the networks of stumbleupon, twitter, google plus, facebook and addthis share buttons on the widget. Once added it successfully, it will be visible as follows. But you have to note that this widget will be successfully placed, only if your post content's width is more than 520 pixels.

Tricks Finder Social Sharing Widget

If the above condition is okay, you can add this widget on your blog.

Step 1 : Go to Edit HTML from the Panel. Then tick on the Expand the Widget Template.

Step 2 : Now find the below code.

<div class='post-footer-line post-footer-line-1'>

Step 3 : Now paste the below code just after the code <div class='post-footer-line post-footer-line-1'>

<!-- Tricksfinder Sharing Scripts Start -->
<b:if cond='data:post.isFirstPost'>
<!-- Facebook -->
<div id='fb-root'/>
<script>(function(d, s, id) {
var js, fjs = d.getElementsByTagName(s)[0];
if (d.getElementById(id)) {return;}
js = d.createElement(s); js.id = id;
js.src = &quot;http://connect.facebook.net/en_US/all.js#xfbml=1&quot;;
fjs.parentNode.insertBefore(js, fjs);
}(document, &#39;script&#39;, &#39;facebook-jssdk&#39;));
</script>
<!-- Google +1 -->
<script type='text/javascript'>
(function() {
var po = document.createElement(&#39;script&#39;); po.type = &#39;text/javascript&#39;; po.async = true;
po.src = &#39;https://apis.google.com/js/plusone.js&#39;;
var s = document.getElementsByTagName(&#39;script&#39;)[0]; s.parentNode.insertBefore(po, s);
})();
</script>
<!-- Twitter -->
<script>!function(d,s,id){var js,fjs=d.getElementsByTagName(s)[0];if(!d.getElementById(id)){js=d.createElement(s);js.id=id;js.src=&quot;//platform.twitter.com/widgets.js&quot;;fjs.parentNode.insertBefore(js,fjs);}}(document,&quot;script&quot;,&quot;twitter-wjs&quot;);</script>
</b:if>
<!-- Tricksfinder Sharing Script End -->

<!-- Tricksfinder Horizontal social buttons Start -->
<div class='promote_post_bg' style='padding:80px 0 10px;'>
<!-- StumbleUpon -->
<div style='float:left; padding-top:1px; margin-left:10px;  margin-right:30px;'>
<script src='http://www.stumbleupon.com/hostedbadge.php?s=1'/>
</div>
<!-- Twitter -->
<div style='float:left;'>
<a class='twitter-share-button' data-count='horizontal' data-lang='en' data-related='' data-via='' expr:data-text='data:post.title' expr:data-url='data:post.url' href='https://twitter.com/share'>Tweet</a>
</div>
<!-- Google +1 -->
<div style='float:left;'>
<g:plusone annotation='bubble' expr:href='data:post.url' size='medium'/>
</div>
<!-- Facebook Like -->
<div style='float:left;'>
<fb:like colorscheme='light' expr:href='data:post.url' font='' layout='button_count' send='false' show_faces='false'/>
</div>
<!-- Addthis Start -->
<div style='float:left; padding-left:30px'>
<a class='addthis_counter addthis_pill_style' margin-left='30px'/>
<script src='http://s7.addthis.com/js/250/addthis_widget.js#pubid=xa-4f70472777fa5939' type='text/javascript'/>
</div>
<!-- Addthis End -->
<div class='promote_buttons'>
<center>A widget created by <a href='http://www.tricksfinder.com/2012/12/tricksfinder-social-sharing-widget.html' target='blank'>Tricks Finder</a>. <a href='http://www.tricksfinder.com/2012/12/tricksfinder-social-sharing-widget.html' target='blank'>Get this</a> if you like.</center>
</div>
</div>
<div style='clear: both;'/>
<style>
.promote_post_bg {
    height: 73px;
    background: url(https://blogger.googleusercontent.com/img/b/R29vZ2xl/AVvXsEjw-n36OKMbvhnNdXaLhmAM2SGURK9xwZ5mN2ET2tuMb0L8AZ2HptjYBQV7hQVg_-uEe8D5uWszzGEzTwq95TeYSCBFnMXLicSI5ZIobRdXoT41XS-pXz-V4_5bZssMIc0Mb1VUw0r7Hm6m/s1600/tricksfindersharing+widget+img.png) 0 -7px no-repeat;
    width: 520px;
    margin:0 auto;
}
.promote_buttons {
    padding: 30px 0 10px;
    align:right;
}
</style>
<!-- Tricksfinder Horizontal social buttons End -->

Step 4 : Save the template. That's all you have to do. Now you will have a nice social sharing widget at the bottom of your blog.

FM Radio Recorder app for your Android Phone

Posted by Golden Dragon In | 2 comments»
I have seen many people download apps from Google Play just for fun. Some of the apps in Google Play doesn't really make any sense. They just develop apps and release it to the market without even testing for compatibility.

Recently I needed to download an app to record some music from the FM Radio and I searched throughout the Google Play. I downloaded around 10 apps and none of them worked really. Most of them were designed to record streaming media (internet radio), which was not the one I wanted in my case. Finally I could find a solution for this.

FM Radio Recorder app for android phones
This app is RecForge Lite which is a dictaphone app that records high quality wav, mp3 or ogg files. The app is originally designed to record high quality sounds. This can originally be used to record meetings, music etc. I tested this with my FM player in my Sony Ericsson Live with Walkman and it worked.

Basically the Lite version offers you 3 minutes of recording time from the .mp3 and .ogg formats and then pauses. So you will be having trouble with continues recording of the tracks from Radio. But there will not be any disturbance for you if you record the FM sound tracks with .wav format.

If you still need to go with continuous recording with mp3 or ogg, you can buy there pro version at an expense of $3.85.

Lets see the steps on how you can record the FM Radio sounds using this app.

First Download the RecForge Lite - Audio Recorder from the Google Play.

https://play.google.com/store/apps/details?id=dje073.android.audiorecorderlite

Then connect the headphones, open your FM Radio player, set the frequency (radio station/channel) you want the app to record and let it run on the background.

Open the RecForge app and start recording. Once the app is started recording the track, set its settings to +2 db or +3 db in order to have a louder sound. Otherwise the recorded sound track would not give a loud output.

When you finish recording, it will automatically saved in your default folder where sounds files are stored.

This trick will help you to record sounds directly from FM Radio, rather than going for streaming internet radio recorder apps.

Verify your Paypal with Payoneer MasterCard and Get a $25 bonus - (Part 1)

Posted by Golden Dragon In | 0 comments»
Payoneer is an Internet-based financial services business that allows users to transfer money and receive payments through re-loadable prepaid MasterCard. Most of the online workers go for a Payoneer MasterCard because it is really easy and convenient.

This prepaid MasterCard offered by Payoneer Affiliate works like any other MasterCard and it is accepted in all locations where MasterCard is accepted. You can use this card at any point of sale location to make purchases. On the other hand you can use this at any ATM where MasterCard is allowed to withdraw money in your local currency though the account is maintained in US dollars (USD).

In this tutorial, I'm going to tell you how to apply for a Payoneer MasterCard, verify your Paypal with your Payoneer MasterCard and load it with Paypal/Moneybookers or CreditCard.

First let's apply for a Payoneer MasterCard. Note that you can have a $25 bonus when your card balance loaded with $100. But to get this you need to register yourself under a Payoneer Affiliate. Then both the affiliate and you, will get $25 each when the account balance reaches $100.

To get that $25 bonus click on the below banner and Sign up for a new MasterCard.

Refer a friend and get $25 bonus

Now you have to fill the details. Make sure that you give correct information in order to avoid your application being rejected. Please give more attention to the below message as it is more important when it comes to verifying your account ownership.

IMPORTANT: Write down your (1) e-mail address, (2) phone number, (3) password, and (4) secure answer. You will need these to access your account and contact Customer Support later.

Once you fill the correct details and submit your MasterCard application form, you will receive a confirmation email that the registration is completed. This is a three step process. When Payoneer team check your application and make sure you are not an existing member, they will send you an email informing your US Payment Service information and a link pointing to upload your verification documents.

To verify this you will need scan your National Identity Card, Drivers License or Passport and upload it to the website. If you are having problem with scanning these, still you can upload a clear photograph of either documents mentioned above. If everything is okay, you will get an email mentioning your debit card delivery date.


Now you have to wait till your MasterCard arrives. Once you got the card, the account verification process can be done using the card. The tutorial on account verification will be published as the 2nd part of this tutorial.

Content Writing – Why is it so important?

Posted by Golden Dragon In | 1 comments»
Content writing is very important to get more organic traffic to your website. Content Writing in simple words is writing content relevant to the user websites. If you pay thousands for the designing of your company’s website, than you should pay equally for the content writing, as both are equally important for increasing visitors to your site. The content of the website should be to the point and crisp to get attention of the reader, and at the same time it must cover the topic. If your website content is not up to the mark, it may lead down your company’s business and affect your online presence as well.

Content Writing for SEO needs special efforts to make it compatible for search engines. It can be classifieds into various types such as content writing for websites, for blogs and to write a simple article to post. Content Writing is just like the lifeline for the website, on which the failure and success of the site depends. So the content should be relevant and unique for the website.

Content writing is a difficult task to do, as no one defines what good content is.
However, we can say that a good content must be unique and useful. Content of a website is created in such a way that is satisfies all the norms of the search engines.

Here are some points to keep in mind while writing content:

1. Choose unique Heading: For best content writing, you should use unique heading for your content, that will also help search engines and readers, as heading is the first thing that a reader’s eye catch, and make them curious to read your content.

2. Stay on topic: While you are writing for your business website, you should write relevant content which is up to the point.

3. Title Tags: Use title tags in your content as it is the best ways of moving your website ranking high on search engine.

4. Meta Description: Write Meta description about 150 words for your website and make sure to use keywords in it. This is the best way for search engine to optimize your website.

5. Write original content: Always write original and fresh content for your website, never write copied content as duplicate content is not allowed in SEO.

6. Choose images: You can choose images for your content to make it more interesting, but to make sure it must be relevant to the content you are providing.

While the help of these points, you can surely write a good content for your website. To have a flourishing website, you need to have sales; to get sales from your product you need to have traffic. Thus, traffic and sales are interdependent. SEO Content is rigid, to the point, cyclic. As the increasing demand of good quality content, there are many jobs available online for free lancers too. Today, Content writers are in high demand to improve the quality of the web content through general content writing and SEO content writing.

Author Bio :- Kapil Garg is the CEO & co-founder of MyGagdgetClub.com. A MBA with technology background. After working for 5 year in IT/Advertising and media I'm now with CNET Infosystem, A total web solutions provider company. Online marketing services include SEO Service India, PPC, Social Media Marketing, Lead Tracking and Reputation Management Services.

ANNO1777 - Play and Make Real Money

Posted by Golden Dragon In | 1 comments»
There are people who love playing games. Some do it for fun. Some are addicted. What if you can earn few bucks via playing games? There are many sites which pay for play, but looks to be real scams. Those are good if you are playing as a hobby. But if you are really looking for some bucks while having a fun with games, then you should select a trusted gaming site.

Anno1777 is one of the online multiplayer strategy games where you can play directly through your browser. This strategy game stimulates a real world situation. Here you are a citizen in 18th century and you have to build your own nation. At the beginning you have to work as a slave by nature and you can gradually build yourself. You can be a governor, military person, or even an emperor depending on your skills.

Anno1777 - Payment ProofsEach one has to register as a slave under another player. This is how it works. Every country has it's virtual currency. When you work everyday, you will earn money. The virtual currency can be converted to real money. At the beginning you may see that your earnings are nothing. But you have to increase your wellness levels and economic score daily by working (working is nothing more than logging in and clicking work button) and buying things. Even you can earn gold by attacking other players and joining country wars.

In order to be a citizen and play Anno1777, you have to reach the Anno1777 site via another players link. So you can join Anno1777 by CLICKING HERE, or using the below banner.

Anno1777 : Earn Money by Playing Online Games

After you have joined work daily by logging in and working, joining attacks, building nation etc. Now Anno1777 has come up with a system to prevent multiple account sign up. It is called Cashtrusted. You can't withdraw your money if you are not verified your account at Cashtrusted. What you have to simply do is go to www.cashtrusted.com, create an account, verify it and add your Anno1777 login details.

Verification procedure is so simple. What you have to do is register an account at Cashtrusted. As the first step, send an SMS to the number they say with your cashtrusted username. Within few minutes you will get a code. Enter the code. Then your phone number is verified.

If you didn't get a SMS with a code, then send an email to support@cashtrusted.com mentioning your phone number and username. Then they will verify the first step manually.

Then you have to verify your address. They will send you a letter with a code to the mentioned address at the address verification step. The letter will arrive to your address within 5 to 20 days. Type the code in your Cashtrusted account and now you are fully verified. Now you can add your Anno1777 account at Cashtrusted with Anno1777 username and password. That's it.

Note : Even if you are still not verified, you can earn money by fighting with other players and making them your slaves. Your slaves will pay you a percentage on every income they receive depending on your wellness percentage.

Play online games and Win Amazon Gift Cards

Posted by Golden Dragon In | 3 comments»
I have been registered in an online game site some time ago. Though I was not a frequent player, I used to play on that site time to time as there was many interesting games on it. Few days back I could redeem a $6.5 Amazon coupon code from them free of charge.

The free online game site where I redeemed the coupon code is KadoKado. KadoKado is one of the most popular online game site which has millions of registered players around the world.

Paid to Play Games
In KadoKado, there are about 75 games which were developed by Motion-Twin. They are divided into two main sections called "Puzzle Games" and "Action Games". Everyday you will receive 4 Green Gems. For each Green Gem you can play a game and accumulate the points called "Kado Points". The Kado Points are the coins in Kado Community where you can redeem for the prizes, Amazon coupons etc.

The Kado Points can be earned by many ways. The easiest way to earn points is by fulfilling contracts on each game. For each game you will have a random amount of Kado points. Then you can earn by winning stars in on each game. Then you can earn points by reaching levels as well. On the other hand you can join to a clan and play together to earn clan points at the end of two weeks period.

There are eight levels in each game. At the end of the each period the best players will go to the next level. So that you will always be matched against the same skill level players. Once you reach 30,000 points you can redeem a $6.5 Amazon coupon instant. You can also redeem $20 Coupon for 80,000 points and $65 Coupon code for 250,000 points.

You can also start playing games at KadoKado. the site link is below.

http://www.kadokado.com

Once you get the code from KadoKado, you can redeem the code at Amazon and it can be used to buy anything at Amazon. Normally it it valid for about 6 months. The below is a screen shot of one of the codes I got.

KadoKado Amazon Gift Card

If you are a game lover, try this. It's really a fun. Have a nice time with KadoKado.

Activate Google Multiple Login in same Browser

Posted by Golden Dragon In | 0 comments»
Normally we all have few email accounts maintained rather than using a single email account. It seems to be useless to someone, but in fact it is more effective to maintain few email accounts just to get rid from spam and bulky emails.

But sometimes you might have disappointed when it comes to log into two or more Gmail accounts. If you need to log into two or more Gmails, you need either to use two separate browsers or log out from one and log into the other.

But most of us are still not aware that Google has introduced multiple account sign in feature. With this now you can log into multiple accounts at the same browser. So that hereafter you don't want to worry about changing browsers to log into two different Gmail accounts at the same time.

Let's see how you can activate this option on your Google Account.

First you need to log into one of your Gmail accounts. Make sure you tick "Stay signed in" checkbox when you sign in.

Then go to the below URL.
https://accounts.google.com/optintoaccountchooser

Then add the desired accounts to your Google account with relevant passwords.

The below image shows a browser which is used to log in with two different Gmail accounts.


If you are using a shared computer or a public computer, this method is not recommended.

Rotating Social Icons and Email Subscribe Widget

Posted by Golden Dragon In | 2 comments»
Any good blog designer would know that if he add a  follow widget to his blog, the site traffic may increase due to the subscriptions. It has a potential to retain the interested visitors and boost the site revisit conversion ratio.

Recently I have seen that many bloggers have added social bookmarking icons to their blogs. But most of their added widgets are not looking good on their blogs and some of them are really untidy as well. So I have thought of designing a widget where you can add subscriptions for your main social bookmarking sites and by email.

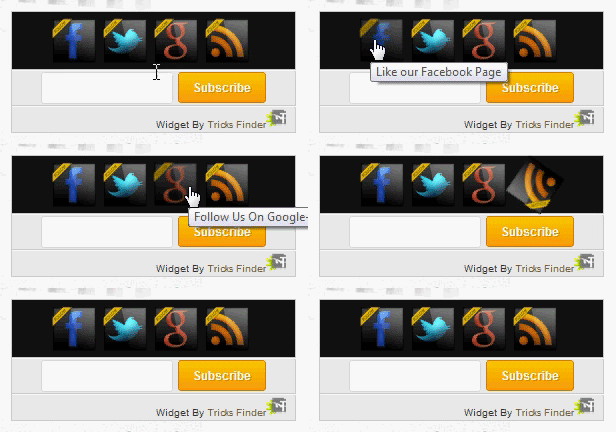
Rotating Social Icon and Email Subscribe Widget
The most interesting part here is the bookmarking buttons are rotating when you take your mouse pointer over the image. The rotating hover effect is designed for the Facebook, Google plus, Twitter, and RSS feed icons. Below the icons, I added an email subscription widget where your visitors can subscribe for email updates. This is solely designed in a way where you can copy and paste in a html/javascript widget. No need to do any xml modifications. All you have to do is replacing the coloured text according to your details.


The below image is the final outcome when you added the widget to your blog.


Lets add the widget now. Follow the following steps.

Step 1 : Go to Blogger dashboard's layout and select "Add a Gadget"

Step 2 : Add a HTML/Javascript. Then copy and paste the below code.

<!--begin of Tricks Finder social widget-->
    <center>
    <div class="TF-Rotating-Bar" style="background: #111111;border: 1px solid #CCC;border-top: 1px solid #CCC;padding: 5px 8px 1px 3px;text-align: center;border-image: initial;font-size:10px;font-family: "arial","helvetica",sans-serif;"><div id="social">
    <!--Start Facebook Icon-->
    <a title="Like our Facebook Page" href="http://www.facebook.com/tricksfinder" target="_blank"><img border="0" src="https://blogger.googleusercontent.com/img/b/R29vZ2xl/AVvXsEg-rxwCUTUcpJdjeWB18VAClXWnn_RcxrIwokw7stuj-oXp7NtTOHxgNxu0VU5_HFh-a3kGclh1GchECd2bVVugvz-6yA0riy8jeyOIK72SoI6aYBSblfhlxvfKcN2nfJMc9ipatDeJ1BQ/s1600/facebook-icon.png" style="margin-right:1px;" alt="Icon"/></a>
    <!--End Facebook Icon-->
    <!--Start Twitter Icon-->
    <a rel="nofollow" title="Follow Our Updates On Twitter" href="https://twitter.com/tricksfinder" target="_blank"><img border="0" src="https://blogger.googleusercontent.com/img/b/R29vZ2xl/AVvXsEh0DG8B_A0FMPAXhzjPiP6XH3k0WEsI4Z1sX2LbFufQZQSX5tlSilSmXe8KD1XpuyFfqA7I5wiS2Lfl8kwM-T7YFNaVItSRS3FG3G11VfP8Z3xNNRXVcjUJbIZe5cIUJLrT08bHzAh3SIE/s1600/twitter-icon.png" style="margin-right:1px;" alt="Icon"/></a>
    <!--End Twitter Icon-->
    <!--Start Google+ Icon-->
    <a title="Follow Us On Google+" rel="nofollow" href="https://plus.google.com/114669905250225341128/" target="_blank"><img style="margin-right:1px;" src="https://blogger.googleusercontent.com/img/b/R29vZ2xl/AVvXsEjj9AcovU5vDcUBX-Ewsitp-vhkctfLpot0PaEb-ZrYE30gdbm4sYOyYh980DqiwatyFNpIa_d8_lsr43qMmVli54ZlULQq9lh3TAxQRBQT3wrGPCoQhfRa_vSS09tOuObUkSVv9tad_68/s1600/google-icon.png"/></a>
    <!--End Google+ Icon-->
    <!--Start RSS Icon-->
    <a rel="nofollow" title="Grab Our Rss Feed" href="http://www.tricksfinder.com/feeds/posts/default?alt=rss" target="_blank"><img border="0" src="https://blogger.googleusercontent.com/img/b/R29vZ2xl/AVvXsEjf8FHYCrNquL1MCLtsLsSpRjIYlmcg_ACKNff960STY93bqba4_UrcAO5JGS18geOqClpogT2x88VMraYWKhi2OzqcS_I_Ub550P7mzZJCvPhVsPjFvRgt3hyphenhyphen8cPFPhSs2x76Dzauv__o/s1600/rss-icon.png" style="margin-right:1px;" alt="Icon"/></a>
    <!--End RSS Icon-->
    </div></div>
    <!-- Email Subscribe -->
    <div id="email-news-subscribe" style="background: #EBEBEB;border: 1px solid #CCC;border-top: 1px solid white;padding: 1px 2px 1px 2px;font-size:10px;font-family: "arial","helvetica",sans-serif;">
    <div class="email-box">
    <form action="http://feedburner.google.com/fb/a/mailverify" method="post" target="popupwindow" onsubmit="window.open('http://feedburner.google.com/fb/a/mailverify?uri=tricksfinder/vsuv', 'popupwindow', 'scrollbars=yes,width=550,height=520');return true">  
            <input class="email" type="text" style="width: 110px; font-size: 12px;" id="email" name="email" value="Enter Your Email.." onfocus="if(this.value==this.defaultValue)this.value=&#39;&#39;;" onblur="if(this.value==&#39;&#39;)this.value=this.defaultValue;" />      
            <input type="hidden" value="tricksfinder/vsuv" name="uri" />
            <input type="hidden" name="loc" value="en_US" />
            <input class="subscribe" name="commit" type="submit" value="Subscribe" />  
        </form>
     </div></div>
     </center>
<div id="TricksFinder"><script src='http://rotate-bar.googlecode.com/files/rotatebuttons.js' type='text/javascript'/>
</script></div>
<!--end of Tricks Finder social widget-->

Step 3 : Replace the above Red urls of the social bookmarking sites with your links. Replace the above Purple text with your feedburner ID. It is usually the last part of the feedburner URL. For an example
http://feeds.feedburner.com/tricksfinder/VSuv

In order to make the widget fully visible, your widget section where you put the code needs to be have at least a size of 250px. Otherwise you will have to remove one of the bookmarking icon. That can be easily done by deleting the whole section between
<!--Start XXXXX Icon-->
<!--End XXXXX Icon-->

That's is. Now you will have a nice rotating subscription box.

Password Protected SMS (Text Encryptor & Decryptor)

Posted by Golden Dragon In | 0 comments»
In modern  telecommunication era, text message sending (SMS) is the the most popular method among teenagers. Low cost, ease of use and lack of complexity may be the reasons for that. Most of us have the ability to type a message within few seconds on phone without even looking the keypad.

It is true that SMS are so popular and widely used, but we cannot ensure security of the messages we receive and send. Anyone can read all your messages if they get your phone.

Have you ever thought that what if there's a method where you can secure your received messages to your mobile phone. For the first time in the world you will be able to secure your text messages in your mobile phone with a highest privacy and safety. This is still in experiment mode. This technology has been discovered by three youngster school boys who are from a South Asian country, Sri Lanka. The new technology is named as TED.

Text (SMS) Encryptor and Decryptor
TED, “Text Encryptor & Decryptor” mobile application will allow you to secure your text messages in your phone. You will experience the best privacy control for your messages from this application. Yet, this application, TED can be used only in java enabled (compatible) phones. But the drawback here is that to gain benefit from this, both sender and receiver should install TED to their mobile phones. You will receive a user account and password when TED is installed for the first time on your mobile. When you will receive a SMS then the same SMS will also receive to TED account. So owner should need to login to the Ted account to read & view the received messages.

The messages you received to your mobile phones are completely limited to you. Only you can read the messages. If unknown tries to read the messages, it is useless as he won’t be able to read it because the messages would display an encrypted form of text such as secret codes.

Those who use TED will receive this wonderful and amazing security and privacy for his mobile phone. The all compliments should go to the three students who created this valuable application named  Roshnal, Adeesha and Chamath.The below is the official website for this application.

http://www.tedmobile.net/

The above application has been developed for the contest Think Quest 2012 organized by Oracle Education Foundation.

Gone PR3 with Yesterday's Google PageRank update

Posted by Golden Dragon In | 0 comments»
As bloggers, many of us target our blogs to compete with others and come up to the first place in Google. I'm not that much good on search engine optimization (SEO) for the tricky articles which I publish. On the other hand I don't have enough time to do bit of SEO for my articles and blog as I am busy with my office work.

Today I got to know that there a rumor saying Google has updated it's pagerank (PR) again. Few weeks ago, may be probably a month ago, I checked my Pagerank after I purchased the domain tricksfinder.com from GoDaddy. It was nothing significant other than a PR0. So I checked my PR just to see whether the rumor is true.

How I got Google PR3 within few months
Whoa...! I couldn't believe my eyes. What I saw was really astonishing. It was PR3 before my domain. I wonder how I achieved such a rank within few months. I just checked my rank with some of my friends those who are really working towards a better SEO rank. But what I observed was that most of their blogs has been demoted in terms of Google PR. According to my recent experience, what I feel is that Google seems to track intentional site promotions other than black hat methods.

So I thought of sharing my experiences on this PR update. I think it would be useful for those who have sites with decreased PR. The below are few tricks I use when I do blogging.

Method 1 : It is stated by many SEO specialists that after the Google Panda update, the PR algorithm has been changed and more weight has been allocated to social network shares. Normally bloggers share their content only to Facebook and Twitter. But I prefer other sharing networks than these primary sites. I used to submit my content especially to Digg and Stumbleupon. But once I got a huge traffic from Reddit as well. I'm not familiar enough with Reddit as it seems to bit complex to me. But may be that huge traffic from Reddit has come from a submission by loyal user at Reddit who visits my blog.

Method 2 : Do submit to other DoFollow social bookmarking sites like Tagza, Supfella, Fundolink. These sites allows you to submit your content and get votes for the submissions. So that you will get some additional traffic as well from those sites if they come up in the top stories of the day. Try to add social sharing buttons widget at the bottom of your blog posts. It will increase the social media impact of the readers of your blog.

Method 3 : Earlier when I put images onto blog posts, I used to do a relevant Google Image search and put an image from the search results. Now I do design a custom image and upload it into the blog post. Once you upload an image, make sure you place alt tags as well. The 'alt' tags will tell what your image is about.

Method 4 : It's better if you can always add a custom permalink to your blog posts. If you add keywords to the custom permalink, then it will increase your search engine visibility.

Method 5 : Add few subscription methods like Facebook fan pages, twitter and G+ follows, Email Subscriptions, RSS feeds etc. Once you post a new post, update those as well. So your subscribers will know that you have updated.

Those are the things I normally do when I post something. Try above few things and see whether it will work for you as well.

How to redirect Godaddy without www domain to with www

Posted by Golden Dragon In | 3 comments»
Do you have a domain purchased from Godaddy? Normally what you do is just connect your website or blog to the domain and continue. But have you ever checked whether your website works without www? If not just try it now. Most probably if you are not aware of that fact, your site without domain would not work.

Normally search engines identify the domain with www and the domain without www as two different domains. Hence it is needed to make sure you redirect without www domain to the domain with www. As I explained in the post how to add GoDaddy domain to your Blogspot Blog, there's a option in blogger to automatically redirect to www.

Redirect Godaddy without www to with www
Why it is so important?

If your domain without www is not redirected to www, then you will lose a considerable traffic to your site. Lets say your domain is popular. Then they will type your site name on the address bar and hit enter. There's a high possibility that they may not type www.

If that happens, he/she may not come to your site. They will see some advertising links of your domain seller and browse away. So you need to forward your domain now.

Let's see how this is done in Godaddy through Domain Name Forwarding.

Step 1 : First log into your GoDaddy Account.

Step 2 : In the Domains Panel, Click Launch.

Step 3 : Select the domain name you want to forward, Click Forward, then select Forward Domain (As in the below picture)

Godaddy domain forward to www

Step 4 : In the popup select http:// or https:// depending on your server settings. In normal cases it is http://. In the Forward to field, enter the URL you want to forward your domain name to. Here add the full domain including www. (As in the below picture)

Godaddy Domain Forwarding wizard

Step 5 : Select Update my DNS setting to support this change. So that your DNS settings will automatically update for the forwarding. Now click OK.

Now your domain is ready. It will take some time (usually around half an hour) to update the changes. Once the changes are updated, your domain without www will successfully redirect to the domain with www.

Are you a Victim of a FB Pornographic Photo Tag?

Posted by Golden Dragon In | 0 comments»
Recently one of my friends had a big problem with his facebook account. He is basically not an IT guy. Joined Facebook few years ago and has added few friends all over the world without personally knowing them. He usually surfs internet and checks for updates on facebook on regular basis at the workplace.

One day when he logs into his facebook account at the workplace his wall was full of pornographic images. The girl next to him has already seen these and she has initially misunderstood him as he's watching porn on his office computer. Unfortunately he was unaware of how to remove the facebook photo tags.

Avoid unwanted facebook photo tags
Improving your facebook account's security is the only thing you have to do to get rid from these bad experiences.

Even though there are many security features offered by facebook, most of us are unaware of these facilities. Let's see how we can improve your facebook account's security.

If you can follow the following few methods, you won't probably be worried about your facebook account's security.

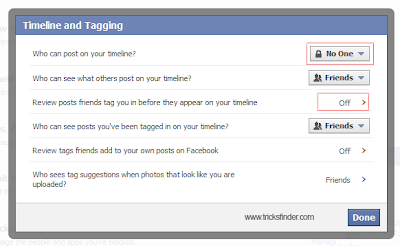
First you need to go to Privacy Settings. Then select Edit Settings on the section Timeline and Tagging.

facebook timeline and tagging

Then you will get a box with the properties as shown in the image below. This is where you need to alter for a better privacy. It's better to change "who can post in your timeline" into no one.

facebook tagging properties
The option to review the friend's post would be set as off on default. So you need to set it On. Then you will get a pop up. You need to make it "Enabled" if it is "Disabled" by default. That's all what you need to stop tagging into posts. If anyone tagged you, you will get an instant notification saying you have been tagged by someone. Then you will have the option to approve the tag or decline the tag.

Further, you can follow few guidelines below in order to protect your facebook account as well. May be you have thousands of friends in Facebook. More friends means you are sociable, but on the other hand that means you are more insecure on your privacy.

Tip 1 : Always look at the address bar before logging into facebook. If you are surfing internet in a cyber cafe, this is a must. Look the address bar twice and make sure that the address is https://www.facebook.com, because there may be phishing sites which looks exactly like facebook.

Tip 2 : Avoid logging into facebook as much as possible from public computers. 

Tip 3 : If you got a friend request by a profile with a half naked female picture, surely it is a fake male account. So be careful when adding them as friends and chatting with them. If your facebook account already has such friends then remove them and report. Otherwise block those accounts.

Tip 4 : Avoid clicking any link which you don’t know. Those links will probably direct you to problematic content. Don't authorize your account for unwanted facebook applications.

Tip 5 : Never give your facebook account password to anyone. Be sure to sign out before you leave the computer.
If you can simply follow the above tips, then you can avoid yourself getting in to more troubles.

Add a custom Permalink to your Blogspot Blog

Posted by Tricks Guru In | 1 comments»
Recently I have experienced that blogger is changing its mechanism and the interface more rapidly. As I feel the main reason behind these changes is to retain the existing blogger users and to compete with wordpress. Most newbie bloggers use blogspot because it is really easy to handle. But when the blogger users gaining the expertise and needing more resources and flexibility, they shift to wordpress.

Hence blogger is adjusting themselves to provide the main features which the existing users are demanding. Now blogger provides many options to the blogger users specially to increase the search engine optimization of the blogger blogs where the early blogger users were complaining of. From those options, one is the introduction of custom permalink to the blogger blog posts.

add a custom permalink to blogspot blog
Permalink is the permanent link address of the web page, shown by the words/text which is in the relevant url. In wordpress you can add any keyword to the permalink, which increases the SEO position of the page. Earlier blogger didn't allow users to change the url as their wish. But now they do.

This can't be done in the normal blogger interface. If you log in to normal blogger interface, you won't be able to see such an option. So you have to go to the below url.

http://draft.blogger.com

Once you logged in and click on a New Post, you will see the option of permalink. Once you click on it you will see automatic and custom options. In custom url option type your desired permalink.

Don't use spaces between words. Instead use the hyphen "-" for the spaces. You are done.

Note : If you are worried about SEO power of the url, try to target a keyword and add the keyword on the permalink. Then your post will be more worthy to the search engines because that's what most of the people would look for.

This method can be used to manipulate the keywords as well. But make sure that you won't add as much as keywords to the permalink. Try this method on your blogspot blog and feel the difference of the outcome of this new option by Blogger.

Google introduces the future Glasses working with your perceptions

Posted by Tricks Guru In | 0 comments»
Google Corporation is now moving towards to create futuristic technical tools apart from its general internet service providing. There are two popular tools such as a vehicle which drive without a driver and a pair of spectacles which operates using artificial intelligence.

On 4th of April, the Google Corporation had launched details regarding this glasses/spectacles with a video which displaying how to operate it.

Google Glasses working with your perception
Outer appearance of this spectacles looks like a fashionable one with a rectangular glasses with a micro camera by the side. If you wear it as a normal pair of spectacles, then you can look through that rectangular glass. It displays a big screen which displays the outer environment as a background with lots of icons.


This screen just looks like a touch screen. But it is operated using eye movements. According to the video published by Google, when look upper right corner of the screen it will display a note of the day’s meetings. Then displays the options in detail. If you want to know about day’s evening whether forecast, all you have to do is looking that relevant icon or place on the screen. Then it will display whether report. Also when you receive a message from your friend it will display as a popup on the screen. To reply it you have to do is just read the reply looking at the microphone icon. Then it will type the reply message and send automatically to the recipient.

You can capture a photograph of anyplace or thing when you go outside with wearing this Google spectacle. Then you can share that photograph online through Google Plus.


These spectacles were designed and created by Google X laboratory which is a modern technical lab. This project was named as “Project Glass”.

The Project Glass researchers are argument that there is a need for getting help from others for further develop these spectacles. So the Google corporation will warmly welcome others ideas and opinions.

How to find your Blog's Feed Address and Importance of the Blog Feed

Posted by Tricks Guru In | 0 comments»
In this post I’m intending to give you a simple, but important knowledgeable facts regarding feeds. Also this post will help you to understand how the blog syndication works with feeds.

Let’s assume you are reading many web sites such as news websites which frequently update their content. Normally you have to go these websites directly and need to look for any updates time to time. Just think about the mess you are going to face when you are reading such kind of 20 websites daily. Also it consumes much time and data when you are visiting each and every website time to time to know about updates.

How to find the feed of a blog and why it is importatnt
So the solution for the above problem is web feeds. When publishing a new content, the feed can be customized to show it's feed either completely or half or with or without images. Anyone can subscribe to a web feed. That means they can instruct their computer programs (Eg: Firefox, Akregator, FeedReader) or web programs (Eg: Google Reader) to read and store updated content in relevant websites within specific time duration. So the user can see updated web contents at once through that program.

There are many advantages in feeds. As mentioned before the users can read new updated contents without visiting the each website. Also it will inform users when the new content published and it allows users to select posts according to their interest by providing summarized feed. The most important thing is that it will protect user’s privacy. Most websites are asking your email address to send newsletters. So there’s a high possibility to receive spam emails to your email address. When you need to unsubscribe from that websites it will ask you to follow specific course of action. But there’s no such kind of hassle when you subscribe a website through web feeds. You can give up reading the feed any time when you want.

Why computer programs cannot read updated web contents without attaching a web feed? Majority of you will have this problem on your minds. The different websites have different contents from different format. There’s no specific standard for web contents so that computer programs are facing difficulties when reading those. That’s why you need web feeds. Web feeds are made according to the international standards. Web feeds have same format in every website. Therefore one program can able to read all feeds. That means feeds are a specific standard of posts which allow to display updated web contents in different web sites in the world.

It's strongly recommended you to have a web feed in your website if your website updates frequently.

Up to above point we are talking about the web feed. Have you ever thought of the meaning of the popular word called RSS? RSS is also a one kind of web feed. There’s another kind of web feed called Atom. The above two kind of web feeds have bit technical differences and will be done same kind of activities. So here I’m not going to explain it in detail. The reason for the popularity of RSS is because that it’s the older one and mostly used one in websites. The main Blog service providers such as WordPress and Blogger will provide both RSS and Atom to their blogs. But in WordPress, main feed is Atom and in the Blogger it RSS.

How to find feed address in your Blog

If your want to get RSS feed in WordPress then add "/feed/" after the end of blog url.

Eg: http://example.wordpress.com/feed/

If you want to get Atom feed in a WordPress then add "/feed/atom/" after the end of blog url.

Eg: http://example.wordpress.com/feed/atom/

If you want to get Atom feed in a Blogger then add "/feeds/post/default/" after the end of blog url.

Eg: http://example.blogspot.com/feeds/post/default/

If your want to get RSS feed in Blogger then add "/feeds/posts/default?alt=rss" after the end of blog url.

Eg: http://example.blogspot.com/feeds/posts/default?alt=rss

Now it’s not a problem to find a feed address in your blog.

If you want to find feed address in other websites, if that websites provide web feeds then look for RSS logo or look for link such as “RSS” “Feed” “XML” “Subscribe to Feeds”.

Reveal your phone's Secrets using Secret Phone Codes

Posted by Tricks Guru In | 3 comments»
Nowadays when using a mobile phone, there is an immense amount of services are provided by the mobile phone manufacturers as well as mobile network operators. Other than these services there are lot of technical information which are stored inside a mobile phone. Some of these information are not retrievable at once. This kind of secret information can be read by using special codes called as Secret Code. When typing these secrets codes in a mobile phone key pad then the relevant details will be displayed in a mobile phone. But these secrets code will be different from type of mobile phones.  

Mobile Phone Secret Codes
Secret codes of NOKIA phones

*#92702689# - Can get a detailed menu including duration of a mobile phone usage, manufactured year, date and selling date.
*#0000# - Can get details such as software editing number, software editing date and model of the phone.
*#7780# - Can reset the phone settings again according to the manufactured company settings.
0 - It will take to the WAP/Internet browser when pressing 0 in main display.
*#06# - Can see IMEI number

Secret codes of Sony Ericsson phones

To get a secrets menu in Sony Ericsson phones need to doing following activities using arrow keys or joysticks with a * mark.

Right * Left Left * Left * - ( Right side to joystick / astrick mark / Left side to joystick twice / astrick mark / Left side to joystick / astrick mark)
#82# - Can get software editing number and date.
0# - Can get a recently dialed phone numbers.

Secret codes of Samsung Android phones


*#*#7780#*# - Can reset the phone settings again according to the manufactured company settings.
*#*#232331#*#* - Can check Bluetooth.
*#*#0*#*#* - Can check LCD.
*#*#22663#*#* - Can check editing of the touch screen.

Secret codes of Samsung phones

*#9999# or *#0837 - Can get details such as software editing number, software editing date and model of the phone.
#9125# - Show software editing.
*#9998*246# - Show debug menu
*#9998*523# - Can check vibration.
*#8999*837# - Show hardware editing.
#*2562# or #*3849# - Can restart the phone.

Secret codes of LG phones

2945#*# or 2945#*01*# - Can get secret menu of the phones.
*#07# - Can get software editing number and date of LG B1200 phone types.
*6861# - Can reset the phone settings again according to the manufactured company settings.
2945#*# - can get software editing number.

Secret codes of Motorola phones

#02#* or *#**837# - Can know software editing.
**0102# or *#**367628# - Can reset the phone settings again according to the manufactured company settings.

Secret codes of Alcatel phones

*#06# - Can get software editing date and IMEI number.
*#4837*# or *#837# - Can get software editing and date.
###847# or *#73738# - Can reset the phone settings again according to the manufactured company settings.

Secret codes of BenQ Siemens phones

*#06# - Can get software editing date and IMEI number.
*#9999# - Can reset the phone settings again according to the manufactured company settings.

Secret codes of Blackberry Smart phones

Press R, B, V, S letters by pressing Alt key – Can see codes of a web page.
Press H letter by pressing Alt and (left) Shift key – Can get “Help me” menu.
Press Alt + (left) Shift + Del by removing battery – Can reset software.

Sometimes these codes may not work for more older versions.

Show a text in a Text Box with Select All Button

Posted by Tricks Guru In | 0 comments»
People are always looking to make their blog look so nice and professional. In order to make it more professional, some kind of editing is needed than just using the blogger's default settings. This post shows how to highlight a particular text or highlight specific code from the rest of the texts that contain post or form the whole blog template.

This has another very important use too. For an example lets say that you have a long html/css code with you and  you need your blog readers to copy that code from your blog or your website. If the code is big enough, you readers would face a difficulty when scrolling down and coping the whole content.


But what if you can enter the whole big code in a small text box with a button to select all. Then that would be great. It will give a compact, professional looking for your blog and an easy solution to your readers as well.

For an example let's say your sidebar is 180 px wide and 200 px high and you need to insert a html code which can be copied by your readers. You may wonder how this is done. Because if you add a html code, it will be automatically converted in the html widget it self. But by this method, that is possible. Just look at the picture. The code is there in the text box. So readers can copy it and paste in their blog.

The same example is shown below as a gadget. Just have a look.


Now let's go for the code for the above widget. The code will look like below.

<div>
<form name="select">
<div align="center">
<input onclick="javascript:this.form.txt.focus();this.form.txt.select();" type="button" value="Select the Below Text" /></div><div align="center"></div>
<p align="center">
<textarea style="WIDTH: 190px; HEIGHT: 100px" name="txt" rows="100" wrap="VIRTUAL" cols="55"><a href="http://www.tricksfinder.com/" target="blank"><img src="http://goo.gl/26BNh" /></a></textarea>
</p>
</form>
</div>

In the above code replace the coloured content as your requirements and add your own the widget as a html/javascript or within a post itself.

Red Coloured Content This is the name which is shown in the button.
Purple Coloured Content -  This is the height and width of the text box.
Blue Coloured ContentThis is the content in the text box.

That's it. Now you can change your long huge paragraphs into a graphical text box.

Easy trick to add a GoDaddy domain to your Blogspot Blog

Posted by Tricks Guru In | 7 comments»
Many blogger users are confused with adding a purchased GoDaddy domain to their blogspot blog. Earlier it was a really complicated thing for a simple blogger as it needed to enter the CNAME Records and A Records at the GoDaddy's domain control panel.

This trick will let you easily register your blog with your preferred domain without much hassle.

Recently Blogger introduced a system for their users to buy from their own domain service at a price of $10. But buying a domain from GoDaddy is really cheap because GoDaddy always come up with different coupon codes.

By applying those coupons would rather make your purchase much cheaper. For an example I bought this domain (www.tricksfinder.com) only for $1.67 by applying their special promotional code.

If you are registered at GoDaddy they will send you newsletters on daily basis or weekly basis informing you what are their promotions. Those promotions are normally coupon codes.

Lets see how a domain is applied to your blogspot blog.

Step 1 : First register a domain at GoDaddy and go to the following Link.

Step 2 : Now you will get a box like in the picture below. In the box type your purchased domain. For an example type it like below and confirm it.


Step 3 : Once you confirmed, GoDaddy will automatically update your DNS records which makes compatible to your blog.

Step 4 : Then you need to update the information in your Blogger accounts settings. Go to,
Settings > Basic
In the the area for "Publishing" click on the link to add a custom domain. Then, click on "Switch to advanced settings."

Step 5 : Then enter the purchased domain in the provided text box and save it. That's all.

Within 24 hours your domain will point to the purchased URL. The older users who has your blogspot domain will be redirected to the purchased domain. Once it is updated see whether the URL without www redirects to your domain. If not just go to publishing and tick on the option to redirect without www to a domain with www. See the below picture to just recap your final steps.

Try this few steps if you got some money to purchase a domain.