How to recover a scratched CD?

Posted by Tricks Guru In | 0 comments»
We have seen that most of the people who used Compact Disks are now moving toward electronic media devices like USB Drives. But at early days there was no such facilities. So people used to save the data on Compact Disks (CDs). Normally CDs were used to keep saved their memories in photos, videos etc.

But with the CDs getting older, they come up with issues on durability. Most of the CDs are now found with scratches. For an example if we are playing an old Video CD, the videos are not played continuously. They get stuck or not responding accurately. So what if your CD's were found with scratches? How do you recover the data which were on it?

This is simple a way how you can cherish your memories by recovering from those scratched CDs.

Step 1 : First take a soft cloth. Place that cloth on a flat surface. Make sure the cloth is not wet. Place the CD on the cloth.

Step 2 : Now hold the CD on one hand and smoothly wipe the CD with the soft cloth. Give more concern to the starched areas. Don't hold the CD tight. Simply do some short and smooth strokes on the CD along the scratched areas. But don't rub it across the scratched area. This will make the scratches worse.

Step 3 : If you see no scratches wash the CD with some water. Don't wipe it with clothes if it's wet. Let it be dry, now you can play the CD.

You can use some toothpaste too if the scratches are deep.It will remove most of the smaller scratches and more of the deep scratches. But this should also be wiped along the scratch, not across the scratch.

Add a nice customized Paypal Donate Button to your Blog

Posted by Tricks Guru In | 4 comments»
People who are interested in blogging really keen to earn few bucks for their hard working. Most of them use advertising networks for this purpose. Anyway it is a good idea to add a Paypal Donate button to your blog because Paypal is one of the largest and most recognized online money possessing system in the world.

On the other hand adding a Paypal donate button will generate some advantages for you than advertising networks. This will make your happy readers to say a big thank you by simply allowing them to donate few bucks for your nice attempt and hard working on posting the useful stuff.

Let's see how this is done. This can be done in two different ways. One is a step by step guide by logging into your Paypal. The other one is a ready made HTML code which you need to simply replace your paypal email. It's really simple.

Firstly let's follow this step by step guide and get the code using Paypal.

Step 1 : Log into your Paypal account.

Step 2 : Go to Merchant Services Tab from the Top Menu.

Step 3 : Look for the Donations link and click on it. Normally it is at the section "PayPal Website Payments Standard". There you will find "Donations" link at the right side box.

Step 4 : Then you will get a three step form to be filled in. In that choose button type as "Donations" from the drop-down menu. If you wish fill the "Organization name/service" and "Donation ID" text boxes. It will track the donations for you if you are putting this donation button on several sites.

Step 5 : Select a Donation button. If you want to put your own donation button, you can give the relevant image URL for that. Fill the necessary information and go to the next step. It is recommended for you to select "Use my secure merchant account ID" in order to protect your email address from spammers.

Step 6 : Customize your checkout page with allowing them to leave a message to you by checking "Can your customer add special instructions in a message to you?". Set customers shipping address as not needed. It will remove complications and will be much more convenient to the donor.

Step 7 : Click on the create button and get the relevant HTML code. Copy that  code and paste it in a HTML/Javascript.

Congratulations! That's it. Now you have a nice donate button for your website.

Now we'll go for the easy method. The main drawback of this method is your Paypal email is visible to others. If you are worried about spam emails, it's better you stay out from the below simple method. Here's the simple code.

<form action="https://www.paypal.com/cgi-bin/webscr" method="post" "target="_blank">
<input type="hidden" name="cmd" value="_xclick" />
<input type="hidden" name="business" value="Your Paypal Email Address" />
<input type="image" src="https://blogger.googleusercontent.com/img/b/R29vZ2xl/AVvXsEgDxNdaPzPyoAq3KWhySugszniRlYSHrTVznU9LloAdoAvHk8wi18KmaUFqaB-ASgR0lrtMM2xgtfnJcGFyXblF3BFBrESSBq7rNQTKBv50rm2GQ3r7fcvfiCi4VYW81QVncrVd46xEWr8/s1600/paypal.png" border="0" name="submit" alt="PayPal - The safer, easier way to pay online!" />
<img alt="" border="0" src="https://www.paypal.com/en_US/i/scr/pixel.gif" width="1" height="1" />
</form>

What you have to only do now is copy this to a HTML/Javascript and replace the red colour text with your Paypal email. Place the code in any place where you like to place your donate button.

Update Windows OS in your Computer without Internet

Posted by Golden Dragon In , | 0 comments»
Microsoft Corporation will issue some security and needed updates frequently. So these updates will be more important for newly found bugs and for your computer's efficiency. But if you don’t have internet
facility at home or if the internet connection is very slow then you will not able to get these windows updates.

So here you will find a simple way that enables you to update Windows OS of your computer without internet facility.

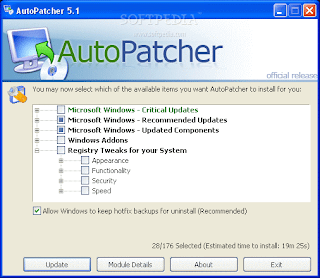
For this purpose we have to install software called Autopatcher. By using this Autopatcher software we can download all the updates that available for windows and can save those updates in your computer which can be installed later without internet.

For this purpose you have to download all this windows updates from internet café or any other computer which has internet facility. Then you can bring those updates to your computer by using a USB drive or any other media.

Now give your attention to the following steps.

• First download the Autopatcher software using the given link here.


• Then install this software as a normal way an open the software.

• After open the software then selects the Operating system which you need and click next.

• Then select x86 if your computer operating system 32bit. Otherwise select x64 if the operating system 64bit.

• Now you can see the list of all updates available for your operating system.

• Select all those updates and click on the download button.

• After downloading all these updates then copy paste all updates to your pen drive.

• Then you can connect pen drive to your computer and can install all these updates to the computer.

By using this way you can download and install all available updates for Windows XP, Windows 7 and Vista to your computer.

What's the best platform to start a blog?

Posted by Tricks Guru In | 1 comments»

Normally the beginners who are going to write a blog will face some questions and difficulties such as can I write a blog for free of charge, how many blog services are available, what is the mostly used blog services, what is the most facilitated blog service available, etc

When you go through these questions one by one you will be able to find two main services available. They are Blogger and Wordpress.com. These two platforms are the most popular among blog writers. 

Now another question might have arisen. That is what the most suitable blog service out of this two is.  This would give you a good analytical answer by comparing the quality of these two services. Here I will do compare between blogger service and wordpress.com service. Do not make confusion on wordpress.com with wordpress.org.

Facility

Blogger.com
Wordpress.com
Best One
Ability to change Template
You can do this freely. Can change template layout and CSS as your wish.
You cannot do this free of charge. Should have to pay a fee.
Blogger
Tutorials/ Help
You can find massive help tutorials through internet.
Less than blogger.
Blogger
Usable blog themes
You can find many good blog themes/ template through internet freely.
Rare chances on getting good blog themes through internet.
Blogger
Essential coding parts
Can use HTML, XHTML, CSS, XML, and JAVASCRIPT. These are easy to learn.
In addition to HTML, XHTML, CSS, XML, and JAVASCRIPT you need the PHP knowledge which is harder than other languages.
Blogger
The outfit of the dashboard, easiness to use and the speed.
Very simple, easy to use and more speed.
Complex and slower than blogger.
Blogger
Recommended quantity of themes/ templates and their situation.
Less quantity of themes and are not in good appearance.
Provide nice set of themes over 100, which have really good appearance.
Wordpress
The ability to replace themes/ templates
You can do this replacement freely and many times by using self made theme or an external one.
You can do this only for themes which provide by the wordpress. Cannot use external themes.
Blogger
Ability to use Widgets and plugins.
Both can use widgets and plugins which provide by the blogger or external party.
Cannot use external plugins.
Blogger
Comments System
Only has facility to delete a comment under comment moderation. Cannot edit the comments. As well as no spam protection. You cannot reply directly to the comments. That means there’s no threaded/nested commenting facility. There is Captcha facility and can build using external commenting system.  
Can edit comments and has a spam protection. Has threaded/nested commenting facility. And can build using external commenting system. 
Wordpress
SEO optimization
You can do SEO techniques as your wish.
Can use within a limit. This will be change the used theme's Symantec Structure from user’s side.
Blogger
Blog Privacy
You can limit a one blog for 100 owners and 100 readers. This is allowed for people who has google accounts. You cannot use passwords for the posts.
This will be limit for 35 readers. You can use a password for the post as well as can create post which is visible only for you.
Blogger
Comment Restriction
This can be limit under the type of google accounts. OpenID account and Anonymous.
This cannot be limited. Any one can post a comment.
Blogger
Blog Import
A Blog can be import only for another blogger blog. (There are external services available.)
Import can be done for another wordpress blog and for Type pad, LiveJournal, Yahoo!360, MovableType
accounts.
Wordpress
Posts and Comment Notification
This can be done by using email. Most probably Google Feedburner will use for this purpose.
Same as blogger
Both
Comment Verification
Can be verifying a human by using captcha facility.
There’s no that kind of service.
Blogger
Video Storage Limit
If you upload a video through this service then allow 16GB. Also can use unlimited service through google video.
Only allow for 3 GB. If you want more then have to pay.
Blogger
Image storage limit
You can own 1GB size of space through Picasa Web Album.
Only allow for 3 GB. If you want more then have to pay.
Wordpress
File type Storage
Limit for PNG, GIF, and JPEG file type.
Can use PNG, GIF, and JPEG file type. In addition can use ppt, .doc, .odt and .pdf file types.
Wordpress
Blog Stats
Include a system for that purpose. Also can use google analytics service.
Less descriptive compared to blogger. Update will be done after 2 days. Not allowed for the use external services.
Blogger
Advertisements
Can use advertisement freely.
Cannot use advertisement. If you need you can get this service by paying some fee but a part of the income will be shared by them.
Blogger
Posts by email
Can be done
Can be done
Both
Post Feed On Mobile Phones.
Will support
Will support
Both

Hope this comparison give a better idea on the difference between blogger and wordpress.com. So it's up to you to select the best blogger service which optimize your requirements.

Set a password to your computer’s USB ports

Posted by Tricks Guru In | 0 comments»
Today's topic is about how to set a password for your computer USB ports. Probably this might be one of the most important topics for most of you. There is a risk that people can take our data through a USB drive if our USB ports are not locked. But if we can put passwords to our USB ports, no one can transfer data from that USB without the correct password.

By following this simple tutorial you will be able to protect your private and very confidential information from anyone because no one can get this information across the USB port.

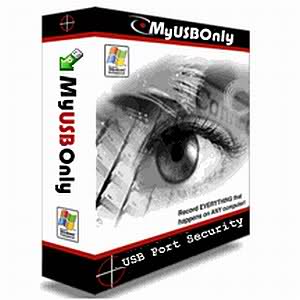
For this purpose we use special software named as "MyUSBOnly". Let’s talk about features of this software firstly.

Features of MyUSBOnly: 

  • Prevent data loss while you are away from home or computer. 

  • Stop information leakage such as documents, photos and videos. 

  • Prevent un-trusted USB storage devices from various users. 

  • Secretly log all USB connect and disconnect activity. 

  • Get an email notification message when an unauthorized USB storage device is connected to your PC.

Then let’s see how to use it. First what you have install this software to your computer. For that just download this and install the below zipped file which includes a crack if you need to use it lifetime. Otherwise install the trial version. This has been tested by Avira that Crack has no viruses, trojans or malware.


After installing this software you will be able to see a USB icon on system tray of your computer. Double click on it and select “General Setup”.

Then type four zeros (0000) in the field called “Required Password” and click allow. (0000 is a default password in this software and you can change this later if you want.)

After that you can customize your ports as your wish. For a step by step tutorial use the Manufacturers Detailed tutorial with this link.

http://www.myusbonly.com/usb-security-device-control/screenshots.php


Make sure you do this simple trick for protect your private information from others.

Protect your email address at the internet

Posted by Tricks Guru In | 0 comments»
Sometime you will receive many unwanted emails to your email address per day. Entering your email in the blogs, forums and websites or subscribe your email in unwanted spammy websites will cause to receive many unwanted emails.

So the email marketing people collect your email address in those forums, blogs and websites by automatically using the special self created bots.

Therefore you want to get some actions to stop this. Otherwise you will receive lot of unwanted emails to your mail inbox. Actually sometimes this will be a mess. But if you want enter your email address in the blog, forum or website just you have to do is encrypt your email address.

Then the bots programs cannot identify your email address and you will not receive those unwanted mails again. Follow the below simple steps to protect your email address.

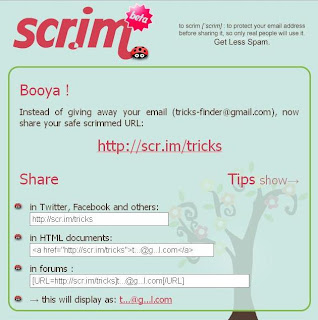
First go to this scr.im website.

Then type your email address in the field called “Email” and type any name as your wish in the field called “Pick your URL” or just leave this field.

Now click the button called “Protect my email."

Now you can see a Scrimmed URL of your email.

 
Now you can display this scrimmed URL instead of your real email address. So any person who wants your email address has to be going through this Scrimmed URL and want to enter right captcha code.

So any bots programs will face difficulties to find your email address. By doing this simple trick you can away from those unwanted emails.

Blocking and Unblocking Websites without any Software

Posted by Tricks Guru In | 4 comments»
In this post I’m going to explain about how to block websites easily without using any software. We have seen that most of the schools and computer institutions are using this way to block certain websites. If you are aware of this method, you can simply unblock the blocked websites using the way that I’m going to explain in this post.

First you need to log to your computer as an administrator for do this. Otherwise you can log to a user account which is making as an administrator. In Windows 7, there's an option called "Run as Administrator". Then follow the following path.

C > Windows > System 32 > drivers > etc

Now open the hosts file using a note pad which is inside in the etc folder. Now you can see the followings.

# Copyright (c) 1993-1999 Microsoft Corp.
#
# This is a sample HOSTS file used by Microsoft TCP/IP for Windows.
#
# This file contains the mappings of IP addresses to host names. Each
# entry should be kept on an individual line. The IP address should
# be placed in the first column followed by the corresponding host name.
# The IP address and the host name should be separated by at least one
# space.
#
# Additionally, comments (such as these) may be inserted on individual
# lines or following the machine name denoted by a '#' symbol.
#
# For example:
#
#      102.54.94.97      rhino.acme.com          # source server
#       38.25.63.10     x.acme.com              # x client host
 127.0.0.1       localhost

Now sites you want to block as a sentence below the localhost line and type the website which you want to block. Look at the following example.

E.g.: 127.0.0.2        www.****.com
E.g.: 127.0.0.2.       www.yahoo.com
If you want to block another website then type is as below.
127.0.0.3       www.****.com

Like that you can type many number of websites which you want to block
by using the following format again and again.

127.0.0.4        www.****.com
127.0.0.5       www.****.com
127.0.0.6, 7, 8, 9, 10…….

Now save this file. But if you not log as an administrator you cannot save the new changes to the file. In Windows 7, you can open the hosts file by right clicking and "Run as Administrator" command.

If you want go to the recently blocked website using any of web browsers. I’m pretty sure you will not be allowed going to these websites.

Also you can unblock the blocked websites using the same way backward. You just have to do is log to the computer as an administrator and erase the line of the blocked website by opening the hosts file with a note pad.

Do this simple trick and enjoy and learn.

Steal your Friend’s Information using his/her IP address

Posted by Tricks Guru In | 3 comments»
In this post I’m going to explain about how to copy other person’s IP addresses using a your own web site and the way of getting real personnel computer information such as internet service provider, type of services, what are the cookies, used web browsing software, computer language, his or her home place and country, the previous web site which is browsed, his or her operating system and the time of the computer.

This is not a black-hat trick. Just an innocent trick to get the details. First you want to your own website for that. If yet you don’t have a website you can use blogger.com to create a web site. Otherwise you can use your own website for this purpose.

Next go to this web site
http://www.opentracker.net/signup?otsrc=menu

and create your own account by filling fields called Email address, website and Password. Also select your timezone because data is stored in only one timezone. Then verify your account by entering your email.

In your mail inbox you can see a java script. Copy that script and go to your website and add this script in to gadgets. That's it in terms of integrating script with your website. Once you have completed that step, go to the following URL.
http://www.opentracker.net/login 

and login your just created account. After that send your website address to person which you want to get details. After confirming that person will enter your site then enter your account at

http://ot3.opentracker.net/login/overview.jsp 

and you can see the above mentioned information of your friend. Hope this trick works for you.

Boost your Internet Speed by 20%

Posted by Tricks Guru In | 1 comments»
This trick is will especially be useful for the people who experience a drastic drop on their internet speed. Normally most of us are using the Windows Operating System. May be you are unaware that Windows keeps reserved 20% of your internet connection for the needs of the Operating System. Hence we can simply get that 20% in order to boost our internet speed.

Now let's see how we can improve the speed of your internet connection. This is not that hard to do. What you only have to do is use the following simple steps.

1. Go to Run ( Start => Run )

2. Type the following command and click OK.
gpedit.msc
Now you will see a window opened with the name "Group Policy Editor"

3. Now follow this path.
Local Computer Policy => Computer Configuration => Administration Templates => Network => Qos Pocket Scheduler  => Limit Reservable Bandwith

4. Then a new window will be opened. In that you would see that it is marked with "not configured". In the help box you can see this.
By default, the Packet Scheduler limits the system to 20 percent of the bandwidth of a connection, but you can use this setting to override the default.
That means by default your internet connection has been  limited by 20%. Because it is marked as "not configured" by default.

5. What you have to do is click on "Enabled" and set the "Bandwith Limit %" to 0.

Check out the following picture if you are confused on the final step.


That's it. Now your Internet Speed has been increase by 20%.

The Correct Way of Cleaning a Computer

Posted by Tricks Guru In | 0 comments»
Most of us are unaware of cleaning a computer in the safest way. The following are the steps which needs to clean your computer in correct manner.

Tip 1 : You should not use any other liquid except for water or Rubbing Alcohol when you clean your computer's the monitor and casing . Strong alcoholic liquids may cause the colours to be fade. Also you should not use these strong alcoholic liquids for circuits.

Tip 2 : To clean the keyboard you can use a small piece of cloth which consists of 90% isopropyl alcohol. Then you can clean your keyboard with that piece of cloth. If you want, you can remove keys in the keyboard by using a screwdriver. Then you can clean and fix it again. Here also you should not use alcohol which goes under the category of Ethyl.

Tip 3 : You can clean your computer by using a Vacuum cleaner. But here you should not connect vacuum cleaner to the direct current. Because the electromagnetic sphere which generate inside the vacuum cleaner will cause to harm your computer’s internal components. But there is no such fault in using a vacuum cleaner which generates power using batteries. Apart from that you can remove dust on computer’s internal components by using compressed air flow. For this purpose you can use a compressed air can which is available in the market. It will remove dust by using it’s air flow. Also you can use a hair dryer which does not pass hot air.

Tip 4 : When cleaning cooling fans should not allow them to rotate and must be open for vacuum or compressed air to access it. To stop rotation of cooling fans can insert a folded paper strip or can apply a small piece of plaster to in it. This is because if the cooling fan is rotating then it will generate a power. This will be harmful for motherboard and power supply unit. Also anything which uses for clean a computer should not be sprayed or poured to the computer components. They should be used with a piece of cloth.

Tip 5 : Keeping your computer clean is a good operating habit. The computer system will become dirty soon if it is open to the air and dust or having meals when using computer.